Saturday, December 21, 2013

Beer and Cheese


Here is what you don’t know about Henry – up until recently, he had set foot into 49 of our 50 states.  So when conversation commenced last spring about where we should travel in the fall, he voted for Hawaii, the last state on his bucket list.   I was lukewarm about the idea, but hey, when it comes to travel, I’m game for just about anything.

Since neither one of us had a clue about the place, we turned to “Travel Agent Extraordinaire”, Doreen Lewis.  With her assistance, we ended up on three islands, experienced everything from volcanoes to lava walks to Jurassic Park (not kidding) to beautiful beaches, luxurious hotels (well, except for the cottage in Volcano Village which was kind of like camping), amazing food and memorable sunsets.  We ate a lot of ahi, fresh from the sea (tuna poke is now on my list of what I want on the menu for my last meal) and became addicted to papaya with fresh lime.  And while we dined well, it’s probably the first vacation where I didn’t gain any weight.  Oh yeah, I would definitely go back!

But alas, reality intrudes and you find yourself hopscotching back to the mainland on a not-so-wonderful plane because you have departed from a small island where they can’t bring in jumbo jets.  You spend 5 hours on that crappy plane, change to a slightly bigger one in LA and arrive home jet-lagged and exhausted.  In a perfect world, you would take a few days to recover, but that is only if you don’t have a son who is opening a craft brewery here in Atlanta.  Yes, you heard me correctly.

More to come about this later, but for now, I will just tell you that my eldest son Andy has embarked upon this venture and it is really, really exciting.  They are opening this spring on the Atlanta Beltline and marketing efforts are well underway.  That includes craft beer tastings at Andy’s home.  Enter Mom.


We arrived home from Hawaii on a Tuesday evening and a tasting was scheduled for Thursday.  Natch, it was my job to provide the food.  I decided to keep it simple, largely because I was still jet-lagged and barely functional.  I remembered that big batch of pesto I made from the last of my summer basil and pulled it out of the freezer.  Savory cheesecake was in order.  That and a bunch of truffled popcorn.  Done and done.  Can Mom go back to bed now?


PESTO CHEESECAKE

For the crust:
1 cup panko (Japanese breadcrumbs)
2 tablespoons unsalted butter, melted
½ cup grated Parmesan (I used Reggiano)

For the cheesecake:
24 oz. cream cheese ( 3  8-oz. packages), softened
2 cups ricotta cheese (you can use reduced fat, but why bother?)
2 teaspoons salt
1 teaspoon cayenne pepper (you can use more or less to taste)
4 eggs (I used extra-large)
2 cups pesto (can be purchased if you don’t have your own on hand)
1 cup pine nuts, lightly toasted
Maldon or coarse sea salt for sprinkling

Preheat oven to 350-degrees.  Grease a 9-inch springform pan.

To make the crust, combine panko, melted butter and Parmesan.  Press into the bottom of the prepared springform pan.  Bake for 10 minutes, until just set.  Remove from oven to cool slightly and reduce heat to 325-degrees.

In an electric mixture, beat cream cheese until smooth and no lumps remain.  Add ricotta, salt and cayenne and mix just until well-blended.  Add eggs, one at a time, beating well after each addition.

Divide batter in half.  Stir the pesto into one half and leave the other half plain.

Pour the pesto batter into the prepared pan.  Scatter the pine nuts over the top, the cover with the remaining (plain) batter.  Sprinkle the top with Maldon or coarse sea salt.

Bake for 45 minutes, or until cheesecake is just set but still slightly wobbly in the center.  Remove to a rack and cool completely, then wrap in plastic and chill overnight.

When ready to serve, run a knife around edges of pan and remove springform.  Place cheesecake on a serving platter and garnish with fresh basil leaves, if desired.  Serve in very thin wedges.

Serves 20 


Cheers and Happy Holidays y'all!


Saturday, September 14, 2013

Pecan Sandies with Integrity


Much to Henry’s chagrin, pre-packaged junk food does not grace the shelves of our pantry.  The reason for this is twofold:  first of all, if it was there, we would eat it and second, if I am going to abandon my skinny cook scruples and eat something like a cookie, I would rather enjoy a homemade one instead of something mass-produced and loaded with trans fats.  Now, I don’t want to sound holier-than-thou (if you could buy ready-to-eat truffled Asiago fries in a bag, I’d be a goner), but why settle for something that comes out of a factory when you can have the real thing?


Take Keebler Pecan Sandies, for instance.  A package of them was always in our house when I was growing up.  I suppose it had something to do with the fact that my mom grew up in the South and therefore anything having to do with pecans was always around.  Even my grandmother, who was an amazing baker and cook, deigned to keep a bag or two around when we would visit.  And although I was always an Oreo-kind-of-kid, it didn’t stop me from devouring those crumbly, slightly dry pecan cookies.


Fast forward to the first time I worked at Watershed (the original one, in that converted gas station in Decatur) and was lucky enough to be in the kitchen with my dear friend, the extraordinarily talented Chef Scott Peacock.  I vividly remember one afternoon in that hot kitchen when I had just finished working the sautĂ© station at lunch.  It had been a busy service and I was sweaty, drained of energy and weary.  As I gathered up my knives to head out the door, Scott gestured me over to the space where he was working.  “Here, taste this,” he said, handing me a small something carefully placed on a paper towel.  “Tell me what you think.”

The “something” was the most delicious cookie I had ever tasted.  It shattered in my mouth as I savored it, evoking faint memories of those old pecan sandies, but amped up to pure perfection.  If I were Giada DiLaurentis on the Food Network, I would take a bite of it, roll my eyes, let out a long “Ummmmmm!” and proceed to describe it as getting the wonderful tastes of butter, pecans and vanilla, all in one ethereal crunchy cookie.  Since I am not Giada DiLaurentis, you will just have to rely on my statement that this was the best cookie ever.

Fortunately Scott had the good sense to include the recipe in the cookbook he wrote with Miss Edna Lewis (pretty much my favorite cookbook of all time, I might mention.  I told him recently that if I could only have one cookbook, it would be this one.  I wasn’t kidding.  If you don’t have a copy, you are missing out – here is the linkhttp://www.ecookbooks.com/p-3925-gift-of-southern-cooking.aspx).

So here is the recipe.  Scott and Edna called them Nut Butter Balls, but I prefer to think of them as Pecan Sandies with Integrity.  Either way, bake up a batch sooner rather than later.  You won't be sorry.  Trust me!


NUT BUTTER BALLS  (adapted from Scott Peacock and Edna Lewis’ “The Gift of Southern Cooking”)

For the cookies:
2 sticks unsalted butter, room temperature                                       
¼ cup granulated sugar
¼ teaspoon salt (I use kosher salt)
1 teaspoon pure almond extract
1 teaspoon pure vanilla extract
2 cups all-purpose, unbleached flour, sifted after measuring
1 ½ cups very finely chopped or grated pecans (about 6 ounces)
3 cups vanilla sugar (recipe follows)                                                        
                                                                                                                               
Using an electric mixer, beat butter and sugar until light and fluffy.  Add the salt and extracts and mix until blended.  Add flour gradually, beating on low speed.  Add the nuts, stopping to scrape the bottom and sides of bowl.  Cover dough and chill at least 3 hours, or preferably overnight.

Shape the dough into 1-inch balls (I use an ice cream scoop for this task).  Flatten each ball slightly and mark the top with the tines of a fork to create lines on top of each cookie.  Place on a baking sheet lined with parchment, wrap well in plastic wrap and chill again until firm (alternatively, you can freeze them and bake as needed).

When ready to bake, preheat oven to 375-degrees.  Place cookies ½-inch apart on ungreased baking sheets (or baking sheets lined with a Silpat).  Bake for 12-15 minutes or until they become slightly firm to the touch and are lightly golden. Remove from the oven and allow to cool for 30 minutes.  Transfer to an airtight container and cover completely with vanilla sugar.  Store up to 1 ½ weeks.

Yield:  4 dozen cookies


For the vanilla sugar:
2 vanilla beans
4 cups granulated sugar

Twist and bend the vanilla beans back and forth to bruise them and release their oils.  Split them lengthwise.  Place one piece in the bottom of a 1-quart jar.  Pour ¼ of the sugar over.  Repeat, using all of the vanilla beans and all of the sugar.  Cover tightly and store in a cool, dark place for at least 4 days before using.

Yield:  4 cups


*  Scott (and Edna if she were here) would probably not approve, but I used the food processor to chop up my pecans.  Just make sure not to overprocess so you don't end up with pecan paste.

*  You don't have to flatten and score the unbaked cookies - you can just roll them into balls and bake that way - but I like the indentations on top as they catch more of the vanilla sugar.

*  Speaking of the vanilla sugar, make extra and keep it in your pantry.  Just replace the sugar as you use it.  Try substituting it for regular granulated sugar when you bake!  Not bad on cereal, either!

*  I recently had a dinner party and made these cookies to serve alongside a silky smooth and scrumptious butterscotch pudding.  Pure.  Heaven.


Sunday, July 28, 2013

Chef Number Five


Yep, I’m still here.  It’s just that in between stints of helicopter parenting and multi-city events involving moving boxes, UHaul trucks and runaway dogs, there hasn't been a lot of extra time for blog posts recently.  I’ll do my best to mend my evil ways.

Oh and then there was also the Chef Number Five thing…..

If you take a look at this, you can probably figure out the identity of Chef Number Five.  Mum’s the word though, at least until the Southern Foodways Alliance holds their annual symposium in October.  Here is a synopsis of the subject they will be exploring.  That’s all I’m sayin’……


Segue into the hot milk cake which Charlotte references in her writing.


When Watershed on Peachtree opened its doors in May 2012, hot milk cake with caramel and sea salt showed up on the dessert menu.  As far as I know, the cake recipe dates back to at least the 1940’s and it was a favorite of many of our grandmothers.  In fact, the Watershed recipe for it comes from Ross Jones’ (one of the owners) grandmother Bebe.  I wrote about this previously:


Of course Watershed’s incredible pastry chef, the very talented Cynthia Long, elevated it to nirvana by giving it a caramel topping and a sprinkling of Maldon sea salt.  Speaking of Cynthia, she needs to be recognized and applauded for her amazing creations.  I am not a fig fan (unlike that silly old man I am married to), but the other day she made an amazing fig and orange sorbet that took my breath away.  So did her “fig newtons.”  And then there were her cookies with whole roasted almonds with olive oil and sea salt.  Oh, the texture and crunch!  No wonder I love working at Watershed!

The upshot is that I tweaked the cake recipe for home use, mostly so I could send it to my new found friend, Charlotte Druckman.  I’m not sure I did myself any favor by doing so, as it will not help me in my quest to become a skinny cook.  Oh, but who cares –  this just might be my favorite dessert EVER!


WATERSHED'S HOT MILK CAKE

6 eggs
3 cups granulated sugar
1 1/2 cups whole milk
1 1/2 sticks unsalted butter
3 cups all-purpose, unbleached flour
1 teaspoon salt
3 teaspoons baking powder
2 teaspoons pure vanilla extract

Preheat oven to 350-degrees.  Butter a 9 X 13-inch rectangular pan and line bottom and sides with parchment paper.  Butter paper.

In an electric mixer, beat the eggs until foamy.  Slowly beat in sugar and continue beating until mixture is thick and glossy.

Place milk and butter in a saucepan over medium heat and stir until butter melts.  In another bowl, sift together the flour, salt and baking powder.

Fold the dry ingredients into the egg/sugar mixture.  Add the milk all at once and stir just to combine.  Add the vanilla extract.

Scrape the batter into the prepared pan.  Bake for 40 minutes, or until cake springs back in the middle and a toothpick comes out clean. Remove to a rack to cool for 20 minutes, then turn out onto a baking rack and remove parchment paper.  Cool completely.


Cut the cake into desired pieces.  I like to split in in the middle lengthwise, then cut into rectangles. 

Spoon caramel glaze over each piece, then sprinkle with coarse sea salt (preferably Maldon).


Caramel Glaze:

8 tablespoons (1 stick) unsalted butter
1/2 cup light brown sugar
1/2 cup granulated sugar
1 cup heavy cream
1/4 teaspoon salt

Place all ingredients into a saucepan over medium heat.  Cook and stir until mixture is blended and smooth.


*  If you ask me, this is a perfect blend of old (hot milk cake) and new (caramel with sea salt).  
*  And if you ask me again - it doesn't get any better than this.
*  Trust me!


Tuesday, May 21, 2013

Bye-Bye Philly


It’s May - the month of innumerable graduations.  As old as I am, one would think I’d be done with that sort of thing by now.  In fact, I thought I was … at least until my younger son Eric decided to start law school at the ripe old age of 26!

So last week we headed to Philadelphia to attend his graduation from Penn Law.  Way to go, Eric! 


Of course, if you are me, you will use an occasion like this to book a table at the best restaurant in Philly.  In my humble opinion, that would be Vetri, which is probably one of my favorite restaurants on the planet.


I’ll spare you my description of the place, since their website does a far better job than I could.  Take a look at it and put it on your radar screen if you find yourself in Philadelphia.  It's like no other dining experience I've ever had .  Because it’s situated in a lovely brownstone, you might think it’s stuffy and formal, but it’s not.  Instead, it’s warm, personable and fun!  Menus are presented to everyone, but you don’t really order – you just tell them if there is anything you don’t like, then they create a beautiful meal especially for you.  Every course is a surprise and of course, it goes without saying that the food is phenomenal. Particularly if you pair it with their recommended wines or beers (yes, a beer pairing – Andy and Eric were happy campers).

One of our favorite dishes was the Sweet Onion Crepe with White Truffle Fondue.  Our wait person casually mentioned that the recipe was in Marc Vetri’s first book, il viaggio di vetri.  Need I tell you what transpired the next day?  Suffice it to say that both Andy and I now have copies of the book!


Now I have not yet found time to tackle the aforementioned recipe, but I did manage to make Jenny’s Ricotta Cheesecake from the book.  Jenny was Marc Vetri's grandmother.  This is another one of those recipes where the sum is greater than the whole of its parts.  It is also unlike your usual cheesecake (of which I am the queen, as you may remember).


No, this one is light, ethereal and addictive in its simplicity.  It’s not particularly gorgeous, but make it anyway.  Trust me!


Jenny’s Ricotta Cheesecake     (adapted from Mark Vetri's il viaggio di vetri)

2 pounds fresh ricotta cheese (see below for recipe)
5 extra-large eggs
1 cup granulated sugar
Juice of 1 lemon
About 1 ½ - 2 teaspoons ground cinnamon

Preheat oven to 350-degrees.  Butter a 2- to 2 ½ quart glass baking dish (preferably round).  Set aside.

In a large bowl, whisk together the ricotta, eggs, sugar and lemon juice until well combined and free of lumps.  Pour into the prepared baking dish and dust with enough cinnamon to lightly cover the entire surface.

Bake the cake for about an hour, or until just set.  It will puff up like a soufflĂ© and when you remove it, it will fall and form a delicious top crust.  Let cool completely, cut into wedges and serve.

Serves 10 – 12


See?  I told you it wasn't pretty!


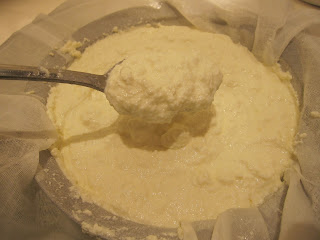
Homemade Ricotta     (adapted from Ina Garten's  How Easy is That?)

2 quarts whole milk
1 quart heavy cream
2 teaspoons kosher salt
1/3 cup good white wine vinegar

Place a large strainer over a large bowl.  Line strainer with 2 layers of cheesecloth.  Set aside.

Combine the milk and cream in a large stainless-steel or enameled pot.  Stir in the salt and bring to a full boil over medium heat, stirring occasionally.  Turn off the heat and stir in the vinegar.  Let mixture stand for 10 minutes until it curdles and separates.

Pour the mixture into the cheesecloth-lined strainer and allow it to drain for about 30 minutes.  Pour off the liquid and allow it to stand for 30 minutes more.  Pour off liquid again, then cover with a piece of waxed paper or plastic and place in refrigerator to drain overnight.  This will result in a thick ricotta.

When ready to use, transfer the ricotta to a bowl, discarding the cheesecloth and any remaining whey.  Ricotta will keep refrigerated for up to 5 days.

Yield:  2 pounds


OK, Liz - bring on the comments!  Here they are ....

*  Take the time to make your own ricotta for this recipe.  It makes all the difference.  Besides, since the cake recipe is so easy, you can devote a small amount of time to make the ricotta!

*  As I said before, this is not a pretty cake.  In fact, it looks downright awful.  While in the oven, mine rose on the sides and stayed sunken in the middle.  Uh-oh.  I thought about trashing it, but persevered.  Glad I did, as the sides deflated as the cake cooled and then it didn't look quite so bad.  And the taste quite made up for it's lack of "gorgeousness."

*  I was dubious about the lemon juice in the cake and the ground cinnamon on top of it.  Cinnamon and lemon juice?  Not necessarily a combo I would embrace.  Nonetheless, the lemon juice gives the cake its brightness and the cinnamon helps create a lovely "crust" on top of the cake when it cools.  Trust me, it works.

*  I tasted this cake both after it had cooled to room temperature and after it had been refrigerated overnight.  Both were delicious, but I prefer the unrefrigerated version as it was lighter and just sort of melted on the tongue.  Nonetheless, I would happily consume this at either temp!

*  Unlike most cheesecakes, this one does not need to be baked in a bain-marie (water bath) and is a snap to put together.  To quote Ina Garten, how easy is that?

*  Lastly, I made a blueberry and raspberry compote to serve with the cake.  Don't waste your time on such adornments.  This thing is best standing on its own.  No fruit or embellishments required.  So what if it isn't pretty?

Now let's talk about that homemade ricotta.  It's absolutely delicious and it has a ton of uses.  Mix it with fresh herbs and Parmesan and use it as a topping for crostini.  Use it in your lasagna.  Mix it with a little pesto and toss it into warm pasta.  My favorite is to dollop some on a round of toasted baguette and top with a drizzle of truffle lavender honey.  Heaven!  Here's where you can buy the honey:


I'm going to miss Philadelphia and its restaurants.  Now it's on to DC, since that's where Eric will be moving over the summer.  Recommendations, anyone?