Thursday, July 8, 2010

Recipes Not Required


A typical Saturday around here goes something like this:

First, a couple hours at the gym.  Henry will take a spin class (maybe even two, back-to-back) and I will take a sculpt class then my favorite step class.  Or maybe we will just get lazy and take only one spin class together.  Whatever.  In any case, we will sweat.  A lot.

Then showers and a bunch of boring errands.  Oh, our exciting lives.  Think dry cleaners or pet supply store for dog food (remember, we have five).  A small bankruptcy results.

Then lunch.  Not at home.  We've earned it (by our convoluted thinking), so something bad is usually involved.  Like Belgian fries from the Porter Beer Bar or bacon-in-a-glass from Leon's Full Service.  Some wine or beer might be imbibed also.  Last Saturday we went to Eclipse di Luna and shared a bottle of rose.  No wonder we aren't skinny!

http://www.theporterbeerbar.com/

http://www.leonsfullservice.com/

http://www.eclipsediluna.com/mc/index_mc.php

After that, it's a trip to the store (or farmer's market) to decide what's for dinner.  Does my life revolve around food or what? 

We figured out a long time ago that Saturday night in an overcrowded restaurant is not for us, so dinner at home is our preference.  Henry says he lives in the best restaurant in Atlanta (flattery will get you everywhere) so I usually cook on Saturday nights.  If the weather is nice, we'll eat outside by candlelight on our front porch, on our patio or in "the Taj" which is the outside room I installed last year in commemoration of Henry's birthday.

Front porch

Patio

The "Taj"

Sometimes I get inspired and creative and spend the rest of the afternoon and evening working on dinner.  Sometimes not.  I've been sick with an upper respiratory infection for the last couple of weeks, so I didn't have a lot of energy this past Saturday night.  I came home, took a nap (not usual for me), then got up to throw dinner together.  I didn't want to "slop the hogs" but a lot of effort wasn't on the menu either.

So it ended up being a simple summer supper without a lot of work.  Here's what evolved, without recipes.  I just winged it.  You can, too!

SAUTEED SOFT SHELL CRABS
Take cleaned soft shell crabs and rinse.  Dip in flour that has been well-seasoned with salt and pepper.  Heat some canola oil and butter in a large non-stick skillet or saute pan.  Add crabs and saute until crispy, turning once.  Drain on paper towels and serve with lemon wedges.


FRESH CREAM PEAS
Rinse peas well and pick through to remove any debris.  Place in a large saucepan and cover with spring water.  Add a little salt and bring to a low boil.  Reduce heat and simmer until peas are just done.  Pour into a colander to drain, then return to pan and add butter, salt and pepper to taste. 

CORN ON THE COB
Shuck corn and remove silk.  Bring a large pot of salted water to the boil.  Add corn, turn heat off and cover.  Let sit until ready to serve, then remove corn and blot briefly with a paper towel.  Serve with lots of good butter and salt.

HEIRLOOM TOMATOES WITH FRESH MOZZARELLA AND BASIL
Do I need to say anything else?  Just make sure you salt your tomatoes and mozzarella VERY well.  You can also add a drizzle of good olive oil, if you like.

I even managed dessert.  A Louisana triple creme cheese from John Folse that I served with salted European butter and quince paste.  We took it, along with our leftover wine, into Henry's mancave and watched a back episode of "Treme."


A perfect day, if you ask me!

Tuesday, July 6, 2010

Retro Reverse

You may remember I mentioned that we drove to Tampa a couple weeks ago to celebrate the brithday of one of my oldest (literally, haha, Richard!) and dearest friends.  We really have been friends for years.

As wedding plans were in progress for Henry and me (a hundred years ago), Henry made a last hurrah trip to Alaska and I made one to the beach in Sarasota.  Dick met me there and we hung out for a few rainy days, stuck in the hotel room while I addressed wedding invitations.

We once had too much to drink and weaved our way through the Kapok Tree restaurant in Clearwater singing Janis Joplin's "Mercedes Benz" at the top of our lungs.  And we swore years ago we would go to the old folks' home together.  Of course, if we ever do, we will take the place by storm - cooking storm, that is.  He and I are both passionate about it.


He swears I taught him how to make risotto.  I think he's so old, he forgets.  He probably taught me.  For his birthday last week, I gave him a copy of Thomas Keller's AD HOC AT HOME.  I challenged him to cook his way through it and he probably thought I was kidding.  Guess what, my friend?  I meant it!  Get cooking, boy!  Throwdown!

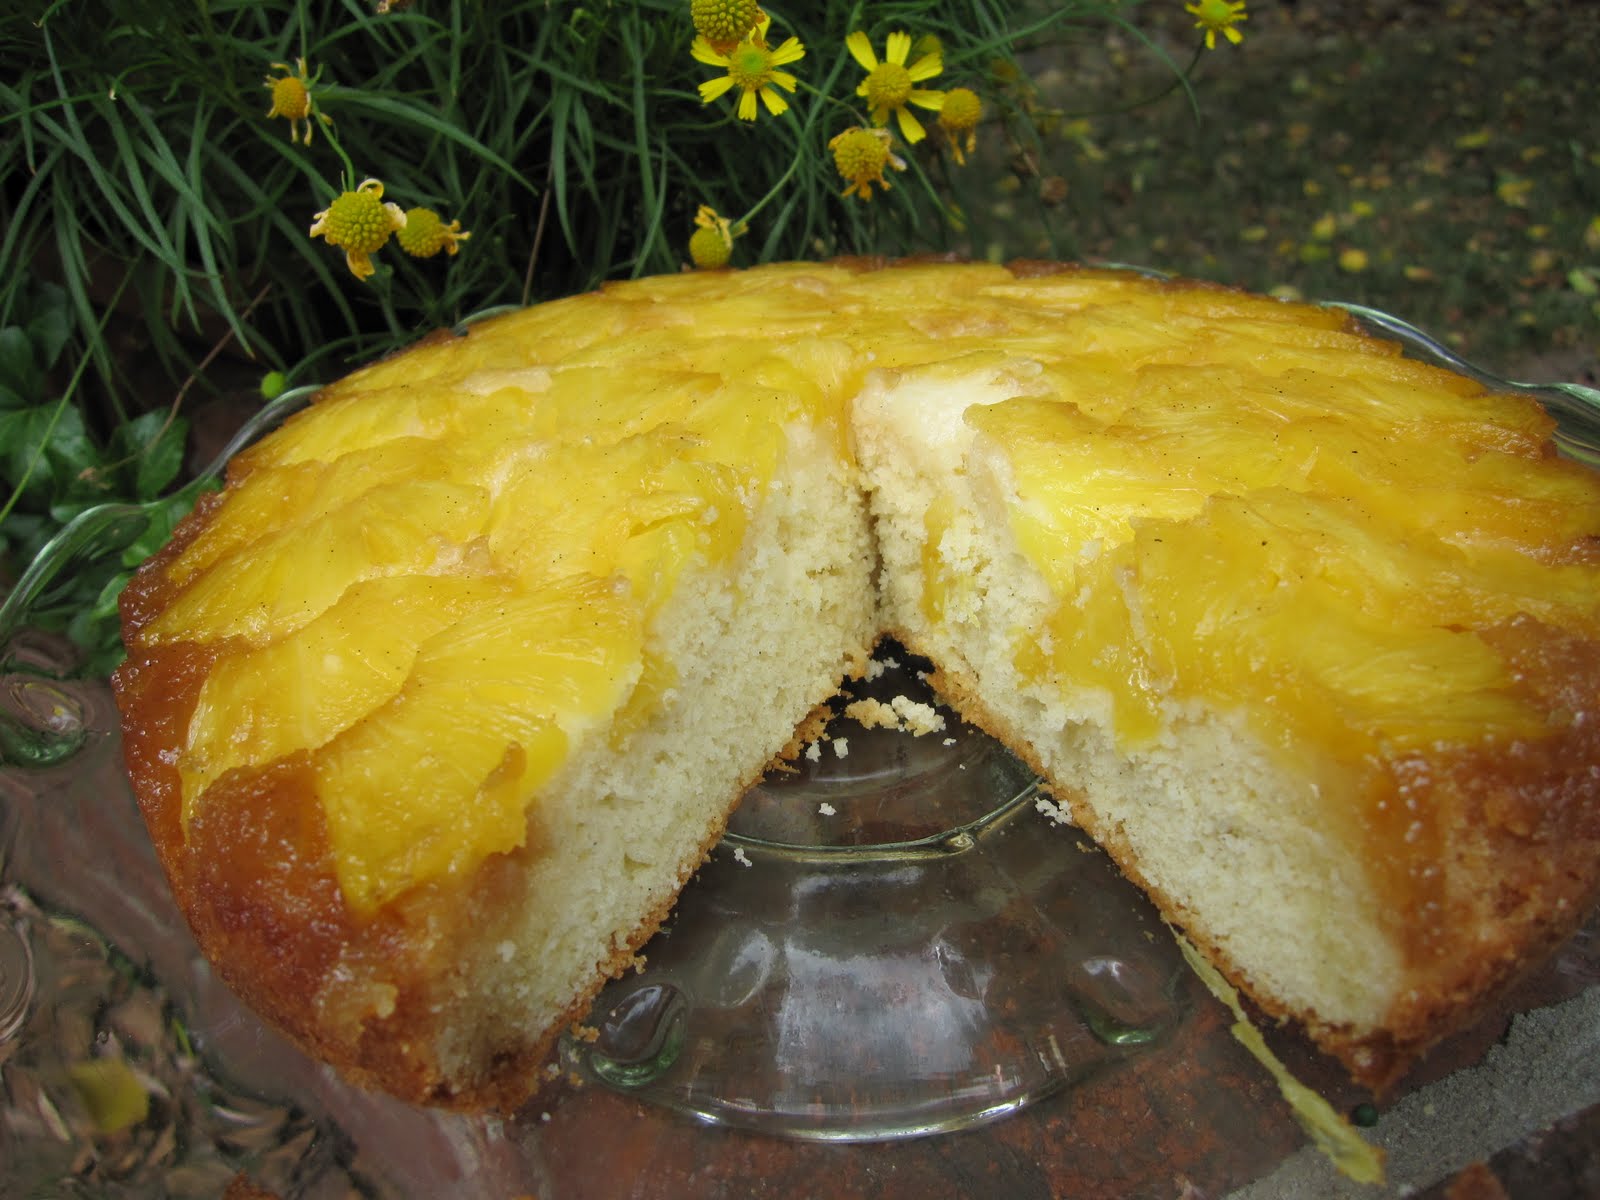
I've got a head start.  I've already made Ad Hoc Brownies and now I have made Ad Hoc Pineapple Upside Cake.  Bring it on, Simpson!


Let's talk about pineapple upside down cake.  I love this dessert.  Next to bread pudding, it's probably the dessert I love the most (no fancy stuff for me, sorry).  My grandmother (who lived in the house I recently posted pictures of) made a good version and that's where I learned to love it.  Yeah, it's pretty retro.  Remember it with the perfectly arranged concentric canned pineapple rings with maraschino cherry halves in the centers?  Oh, so fifties!

Thomas Keller has now updated it with the use of a silicon baking pan (genius!) and a brown sugar pan "schmear."  His "schmear" method eliminates the graininess of the original brown sugar topping.  And of course he has eliminated the maraschino cherries.  Good call, Thomas!

PINEAPPLE UPSIDE CAKE  (from Ad Hoc at Home by Thomas Keller)

Pan Schmear:
8 tablespoons unsalted butter, room temperature
1 1/2 tablespoons honey
1/2 teaspoon dark rum
1 cup light brown sugar, packed
1/4 teaspoon vanilla paste or pure vanilla extract
Kosher salt

1 Gold (extra-sweet) pineapple

In the bowl of an electric mixer fitted with a paddle attachment, combine butter, honey, rum, brown sugar and vanilla and beat until smooth and well-blended.  Spread 1/3 cup of the schmear over the bottom of a 9-inch round silicone cake pan.  Sprinkle lightly with salt.  (The remaining schmear can be refrigerated for up to 2 weeks or frozen for up to 1 month; bring to room temperature before using).

Cut the top and bottom from the pineapple and cut away the peel.  Cut the pineapple lengthwise into quarters and cut off the core from each section.  Cut each piece crosswise into 1/8-inch thick slices.  Beginning at the perimeter of the pan, make an overlapping ring of pineapple slices with the curved side facing out.  Make a second ring inside the first one, overlapping the slices in the opposite direction, working toward the center of the pan.  Reserve any extra pineapple for another use.

Cake:
1 2/3 cups cake flour
2 teaspoons baking powder
8 tablespoons unsalted butter, at room temperature
1/2 cup plus 2 tablespoons granulated sugar
1/2 teaspoon vanilla paste
2 large eggs (I used extra-large because that's what I had on hand)
1 tablespoon plus 1 teaspoon milk

Preheat oven to 350-degrees.  Sift flour and baking powder together; set aside.  Put the butter and sugar in the bowl of an electric mixer fitted with the paddle attachment and mix on low speed to combine, then beat on medium speed for about 3 minutes until light and creamy, stopping to scrape down the sides as necessary.  Mix in the vanilla.  Add eggs, one at a time, beating until the first one is incorporated before adding the second and scraping down the sides as necessary.  Beat in the milk.  Add the flour mixture in three parts, beating until just combined.

Pour the batter into the pan and spread over the pineapple.  Bake for 15 minutes then rotate the pan and continue baking for another 20 to 25 minutes until a cake tester or skewer inserted into the middle comes out clean.  Cool the cake on a cooling rack for 20 to 30 minutes.

Run a knife around the edges of the cake, invert onto a serving platter and serve warm.  Leftover cake can be stored at room temperature for up to 2 days.

Serves 8


As usual, I have a couple of things to say.

First of all, if you can't find vanilla paste in your local store, Amazon sells it. 
http://www.amazon.com/s/ref=nb_sb_noss?url=search-alias%3Dgrocery&field-keywords=vanilla+bean+paste

Second, it is well worth it to buy yourself a silicon baking pan if you don't already own one.  It makes getting the sucker out of the pan MUCH easier without leaving half of the topping in the bottom.  I got mine at Bed Bath and Beyond for about $10. 
http://www.bedbathandbeyond.com/product.asp?SKU=14758240

I've got mixed reviews on this recipe.  As I said earlier, I like the "schmear" idea.  But I didn't think there was enough of it, so I would probably use the entire amount next time.  Then again, if you don't want your cake to be very sweet, you might disagree with me.  Personal preference.

This recipe produces a cake with a very fine crumb.  I might like that for another cake, but I sort of like a more "homespun" version for a comfort food recipe like this.  I also thought it was too dry.  Next time I make it, I would cut down slightly on the baking time.  I would also consider serving it with a little freshly whipped cream.

Do you remember "Fried Green Tomatoes?"  I was lucky enough to be on the food styling team for that movie.  The sushi Kathy Bates ate was brought to the set personally by me!  See the plate in this picture?  I have 15 of them.  They were some of the props we used for the Whistle Stop Cafe.  Cool, huh?


Speaking of plates?  Step up to it, Simpson!

Friday, July 2, 2010

Red, White and Blueberry

Don't worry, I'm not going to post something ridiculous with red, white and blue icing.  I'll spare you that, but I hope you have wonderful plans for this fourth of July weekend and that you are firing up your grill.  I'm actually working on the fourth, but it involves a photo shoot with fabulous food and we will be heading up to Lake Rabun for it, so really, can I complain?  Heck no, I'm looking forward to it!

But back to the blueberry part of this post.  Big, beautiful local ones have been showing up at the farmer's markets here lately, and I can't resist.  Blueberries and ripe, juicy heirloom tomatoes epitomize the best of summer's bounty to me.  Corn, too but we haven't enjoyed much of it since we try to stay (kind of) carb-less during the week.  Oh, the curse of the fat gene!


One of my favorite pairings is blueberries with fragrant, sweet mango.  With a touch of lime.  Andy (the son in NYC who loves to cook) was making dinner recently and asked me if I had any suggestions for a light, non-dairy dessert.  I mentioned the blueberry/mango combination and that's what he made.  Apparently it was a hit.  I hope he impressed the hell of out her!

There really isn't a recipe for this, but here's the basic:

BLUEBERRY-MANGO "PARFAIT"

1 pint fresh blueberries, washed and stemmed
1 ripe mango, peeled and cut into chunks
1 tablespoon granulated sugar (or more or less, depending upon sweetness of fruit)
Zest of one lime

Combine blueberries, mango and sugar in a bowl.  Stir well and let sit at room temperature for about an hour.  Spoon into parfait or martini glasses, sprinkle with lime zest and serve.

Serves 4

Obviously, you can make this in whatever combination or quantity you choose.  It keeps for about two days in the refrigerator.  Know how you open the refrigerator door somethimes and stand there while you try to figure out what you want to snack on?   This is a really good option and it keeps you away from the stuff (like the caramel sauce in there) that's not-so-good-for-you.

Of course, the not-so-good-for-you stuff is what I REALLY want to eat.  That's why I made my favorite cake last week.  I make it once a year, when blueberries are at their peak.  I was good; I made it, then gave it away, but not until Henry and I shared a hefty slice before it departed. 

Here it is.  I adapted it from Bon Apetit.  The original recipe called for a white chocolate frosting, but I'm not a big fan of white chocolate, so I substituted cream cheese frosting instead.  Much better, I think!  If you need a recipe for it, here's the one I use:

http://nevertrustaskinnycook1.blogspot.com/2009/10/humingbird-cake.html


LEMON-BLUEBERRY CAKE

3 1/3 cups cake flour
1/2 teaspoon kosher salt
1/2 teaspoon baking powder
1/2 teaspoon baking soda
1 1/2 sticks unsalted butter, softened
2 cups granulated sugar
1/3 cup fresh lemon juice
Zest from one large lemon
4 extra-large eggs, room temperature
1 cup plus 2 tablespoons buttermilk
2 1/2 cups fresh blueberries, tossed with 2 tablespoons flour
Cream Cheese Frosting (see link above)

Preheat oven to 350-degrees.  Butter two 9-inch round cake pans and line bottoms with parchment.  Butter again and dust lightly with flour.

Sift flour, salt, baking powder and baking soda.  Set aside.  Using electric mixer, beat butter until fluffy.  Add sugar and continue beating, scraping down sides often until mixture is light and creamy, about 8 minutes.  Beat in lemon juice and zest then add eggs one at a time.  Scrape bowl down after each addition.

Add flour mixture and buttermilk alternately, beginning and ending with flour.  Do not overbeat.  Remove bowl from mixer and finish combining by hand, using a large spatula or wooden spoon.  Gently fold in berries.

Divide batter between prepared pans.  Rap each pan one time sharply on countertop to remove air bubbles.  Bake until cake tester comes out clean, between 30 and 40 minutes, depending upon your oven.  Cool on racks for at least one hour or longer.

Frost layers with cream cheese frosting.  Garnish with lemon slices and fresh blueberries, if desired.  If you really want to go overboard, slice each layer horizontally so that you have four layers, then fill and frost as usual.

Serves 10-12

Note:  I baked my layers for 40 minutes, and they were a little too dry for my taste.  You should start checking for doneness at 30 minutes.  Also, this cake is much, much better a day or two after you make it so that all the flavors start to meld.  If you make it tomorrow, it will be perfectly "cured" for your Fourth of July celebration on Sunday!

Tuesday, June 29, 2010

Retro Recipes, Part Two


Would someone please just kill me if I buy another cookbook? 

With the collection I have, it's criminal to think about buying more.  I've often thought there are really no original recipes left (unless you count molecular gastronomy, which doesn't compute in my kitchen).  Yes, there are techniques and versions of recipes, but at the end of the day, fried chicken is fried chicken. 

Which leads me back to that retro collection of cookbooks I mentioned in the last post.  Most of them have languished on my bookshelves for so long that they are encrusted with dust.  That's about to end.

I began by pulling out my old Maida Heatter cookbooks.  Remember her?  She was the feisty, down-to-earth baker from south Florida who took no crap from anyone.  Her recipes were (and still are) winners.  I could bake everything in her books and never, ever need another baking cookbook.  I heart her.  I hope she's still alive.

Let's talk about her book "Maida Heatter's Book of Great American Desserts."  As soon as I picked it up, I remembered her "Bulls Eye Cheesecake."  Back in my younger days, I attempted to make it.  I didn't have much patience back then, so while the finished product tasted good, it didn't have that "WOW" presentation factor.  Oh, but I SO nailed it this time.  If you really want to know the truth, I am dancing up and down right now over how I nailed it.  Hell yes, I rocked it!!

So can you.  Just follow my directions and have some patience.  Prepare for major accolades.


BULL'S EYE CHEESECAKE  (from Maida Heatter)

32 oz. cream cheese, room temperature
1/4 cup sour cream
1 teaspoon pure vanilla extract
1/4 teaspoon almond extract
1/4 teaspoon salt
4 extra-large eggs
2/3 cup granulated sugar
2/3 cup dark brown sugar, firmly packed
1 teaspoon powdered espresso, dissolved in 1 T. hot water
2 teaspoons good cocoa powder (I used Valhrona)
1/4 cup crushed cookie crumbs (I used Pepperidge Farms Milano)

In electric mixer, beat cream cheese until smooth.  Beat in the sour cream, extracts and salt.  Beat well until no lumps remain, scraping down bowl frequently.  Beat in eggs, one at a time. 

Remove bowl from the mixer.  You wil have about 6 cups of the mixture.  Place half of it (3 cups) into a separate bowl.

Add the granulated sugar to one bowl and the brown sugar to the other.  Mix each well with a rubber spatula. 

To the brown sugar mixture, add the dissolved coffee and the cocoa powder.  Stir well to blend.

Now to form the design:


Butter an 8 x 3-inch cake pan.  Line bottom with parchment and grease well.  Pour a scant cupful of the chocolate batter in the pan.  Let it spread, then pour a scant cupful of the vanilla batter over.  Take your time and pour it very slowly, so that it forms an uniform circle over the chocolate batter in the pan.  Repeat with remaining chocolate and vanilla batters.  Remember, patience is a virtue here.

Carefully transfer the pan into a larger pan filled with warm water.  Place in oven preheated to 250-degrees and bake for 1 hour or until just set and middle is still slightly wobbly.  Remove from heat and place on a rack to cool.  Chill.


To remove from pan, dip briefly in hot water.  Shake pan to loosen, then turn out onto a sheet lined with parchment or plastic.  Press cookie crumbs over then invert onto serving dish.


Yield:  8 servings (or 12 if you are feeling stingy).

This may be the most spectacular dessert I have ever made.  Seriously!

Friday, June 25, 2010

Retro Recipes, Part One

Drinking bird.  Retro enough?

I think it started last weekend when we were in Florida.  My mom is from St. Pete and we visited every summer when I was a kid living in the northeast.  I also went to school in Tampa and lived/worked there for several years thereafter.  Visiting last weekend was a true flashback for me since I hadn't been there in years.  I made poor Henry drive for miles (he was really gracious about it) so I could re-visit all those places that held memories for me.

Here's a picture of my grandparents' house.  It wasn't fancy, but we had great times there, playing Kanasta on the back porch and eating simple, delicious food.  My grandmother was a great cook (I'm sure that's where my "cooking gene" came from) and she was the original farm-to-table advocate.  She had a huge peach tree, an avocado tree, a mango tree and a grapefruit tree.  As a kid, I loved nothing more than walking around with her as she carried her basket and selected only the ripest, juiciest fruit.

I started cooking when I lived in Tampa.  I had two cookbooks which were my bibles.  I made everything from cheese fondue (c'mon, it was the seventies!) to roasted turkey and chocolate souffle.  Not everything was a huge success, but I taught myself a lot and created the backdrop for a lifelong joy of cooking (yeah, I had that book, too).  Too bad the guy I was married to then subscribed to the "eat to live" philosophy instead of my "live to eat" credo.  Guess that marriage was doomed from the start!

Alright, I'll get to my point now.  (Sorry for the ex-husband rant).  When I got home, I pulled out those old cookbooks and thumbed through them.  I came across the butter crisp cookies I used to make from the McCall's Cookbook.  I decided they would be my next experiment.

Mind you, the original recipe was good enough.  But I tweaked it a little and now it's even better.  These are crispy on the outside, tender on the inside and not crumbly like shortbread.  When you bite into one, you get the crunch of the sides and bottom, a hit of the mace (crucial to this recipe) and just a teeny-weeny hint of salt.  I substituted vanilla paste for the vanilla extract and it resulted in a little extra crunch of "vanilla bean-i-ness."  If you can't find the paste, pure vanilla extract will do just fine.


BUTTER CRISPS (adapted from The New McCall's Cookbook)

1 1/2 cups unbleached, all-purpose flour
1/2 teaspoon ground mace
1 cup unsalted butter
1/2 teaspoon kosher salt
1 teaspoon vanilla paste
1 cup confectioner's sugar

Sift flour and mace together.  Set aside.

In electric mixer, beat butter, salt and vanilla paste until light and fluffy, about 5 minutes.  Scrape down bowl often.

Gradually beat in sugar, the flour mixture.  Beat just until smooth.

Flatten dough into an oval, wrap in plastic and refrigerate until chilled.  Using a 1-1/4-inch ice cream scoop, form dough into small balls.  Place on a baking sheet and freeze for at least 2 hours (note:  you can keep these, well-wrapped in the freezer for up to six months).

When ready to bake, preheat oven to 350-degrees.  Line a baking sheet with parchment paper or a silpat.  Place frozen balls on baking sheet, spacing them 2-inches apart.  Bake for 12 minutes or until sides are just golden but tops are still pale.  Cool slightly, then remove to a baking rack and cool completely.

Yield:  approximately 2 1/2 dozen cookies

Please don't overbake these (that seems to be my mantra recently).  When you take them out of the oven, they should be slightly puffed and just golden on the sides.  If you wait until the tops are golden, then you have blown it!

BTW, there is a freshly baked batch of these sitting in my kitchen right now.  Oy veh.  Will she or won't she?

Tuesday, June 22, 2010

Pig Heaven


We are just back from a quick trip to Tampa to celebrate the birthday of one of my oldest and dearest friends.  I'm working on some additional posts, but for now I had to share this with you.

We drove down there on Saturday and it's about a 7-hour drive from the ATL.  Breaking up the drive with a lunch stop seemed like a good idea.  Except, we were on an interstate in southern Georgia which is pretty much a culinary wasteland.  Burger King, anyone?

That would be a negative.  But I will throw some of my standards out the window and eat at Chik Fil A.  I can easily make a meal out of a chargrilled chicken sandwich and a diet lemonade.  Of course, we're not going to talk about sustainability or anything else related to the way all that chicken is processed.  We won't talk about chemicals, either.  Still, if you're on the road, it's one of the better fast-food options.

Our stomachs told us it was time for that lunch break right around the time we hit Cordele.  We exited the highway and passed every fast food place you've ever heard of (and some you probably haven't) except ...  Chik Fil A.  Alrighty then.  No McDonald's or Taco Bell for us.  Onward to Tifton!

The 30-minute drive to Tifton gave us time to plan a new strategy.  Surely we could find some good local barbecue!  I unearthed my iPhone from the bottom of my purse (no driving and texting for me) and shook up the Urbanspoon app.  A few shakes and we hit on Hog-N-Bones Bar-B-Que.  With a name like that how bad could it be?  We found it and were relieved to see cars in the parking lot.  Then we realized it was a fast food joint with nary a smokehouse in sight.  Crap.

Back to the app and we came up with Pit Stop Bar-B-Q and Grill.  By now, I didn't have high hopes for anything, but we called and it was open so we backtracked a highway exit and found the place.  It looked pretty ordinary but by this time we were famished and needed to get out of the car.  And then we spotted their smokehouse in the back.  Done deal.


People, we got lucky!  The pulled pork was delicious - tender without being too fatty, with lots of those little burned, smoky bits that make it delicious.  The sauce was good, too.  Tomato-y, but not too much so, just a hint of sweetness (I loathe sweet barbecue sauce), good acidity and just spicy enough.  What a find!

The woman who owns it spent a fair amount of time at our table, telling us about the history of the restaurant.  She and her husband started it 15 years ago.  They take great pride in everything they do and she spends a lot of time in the dining room, talking to everyone to make sure they are happy.  (Trust me, they are)  Sadly, her husband died a few years ago, but she continues to take great joy in running the restaurant, in part because she wants to carry on his legacy.  She's doing a great job of it.

Oh, but check out their T-shirts!  I couldn't restrain myself and bought three of them (look out Andy & Eric, guess what's showing up in your respective mailboxes?)  Hilarious!


So if you find yourself on I-75 near Tifton and need a decent barbecue fix, remember this place.  Pit Stop.  Exit 63-B.  You won't regret it.  We liked it so much that we stopped in on our way back from Atlanta yesterday and bought a couple pounds of their pulled pork to bring back with us.  Had to get-us some!

Friday, June 18, 2010

My Nasty Little Pie Crust Secret

Remember those brownies I told you about the other day?  Have you tried them yet?  If not, get in gear and make them! Yeah, they are that easy.

Because of that, it gave me the time to make another dessert to take with me the other evening.  I made my favorite Individual Pecan Tarts with Jack Black.  Like the ones I used to make when I worked at Watershed here in Atlanta.

http://www.watershedrestaurant.com/

First though, I need to make a confession.  I always have a supply of homemade pastry dough in my freezer.  I also need to confess that it really isn't pastry dough at all.  It's shortbread that you press into the pan and pretend you have just made the most incredible pie dough in the world.  No rolling out, no transferring to the pan, no nothing except a little fingertip action.  It turns out flaky and delicious, you will get rave reviews and no one will ever know this is pie crust for dummies. 

Okay, I feel better now that you know the truth.

This pecan tart recipe comes from my dear friend Scott Peacock and you can find it in the book he wrote with the late, great Edna Lewis, "The Gift of Southern Cooking."  Someday, I will tell you the story of how she taught my son Andy to make biscuits and pie crust when he was about twelve.  For now, I will just tell you to raise a glass of Jack Black to her as you add it to the filling for this recipe.  Here's to you, Miss Edna - we are better for having known you.


INDIVIDUAL PECAN TARTS WITH JACK BLACK

For the dough:
1/2 pound unsalted butter, cut into pieces
1/4 cup granulated sugar
2 cups unbleached, all-purpose flour
1/2 teaspoon sea salt

Put butter in electric mixer fitted with paddle attachment.  Mix on medium speed until softened.  Add sugar and increase speed to medium high.  Mix until well-blended and sugar no longer grates on bottom of bowl.

Reduce speed to medium low and add flour and salt in two parts.  Increase speed to medium when mixture starts to get mealy.  Continue mixing until dough comes together. 

Place dough on a sheet of plastic wrap and flatten into an oval.  Wrap well and refrigerate.  Dough may also be frozen - it will keep for several months.

Butter eight 4-inch tart pans with removable bottoms.   Cut off small pieces of the chilled dough and grate on the large holes of a box grater.  Press dough shavings on bottom and along sides of tart pans.  Make sure to press in well so that dough is thin enough to be crispy but thick enough not to fall apart.  Level top with the blade of a sharp knife.  Chill well before proceeding with recipe.

For the filling:
3 eggs (I use extra-large)
1 cup granulated sugar
1/3 cup unsalted butter, melted
1/2 teaspoon kosher salt
1/2 cup dark corn syrup (Karo)
1/2 cup white corn syrup (Karo)
3 tablespoons Jack Black Kentucky bourbon
2 teaspoons pure vanilla extract
Whole pecans (approximately 8 per tart)

Preheat oven to 35-degrees.  Beat eggs lightly with a whisk.  Add sugar, butter, salt, corn syrups, bourbon and vanilla.  Whisk until all ingredients are well-blended.

Layer whole pecans decoratively in unbaked tart shells (don't overlap too much).  Spoon filling mixture over each one, filling almost, but not quite, to the top. 

Bake for 15 - 17 minutes or until golden but still soft in the middle.  Remove from oven before you think they are done as they will continue to cook when you remove them from the oven.

Cool on a rack for 15 minutes, then gently remove sides of tart pans.  Carefully slide a long, thin knife underneath tarts to remove bottom of tart pans.  Handle gently as these can break easily.  Place on a baking rack to cool completely.

Yield:  8 individual tarts

You can also make this into one 9-inch tart but you will need to increase baking time.  You could also gild the lily and serve these with whipped cream, but I prefer them straight up.

And if you have any dough left over - freeze it, baby, freeze it!  It will then be available to you on a moment's notice and no one will ever know the difference!