Monday, March 28, 2011

A Guilty Pleasure


Unfortunately, in my quest to someday become a skinny cook (which will likely never happen), I try to avoid eating stuff like that.  My 5-day-a-week routine involves mostly protein, lots of veggies and of course wine, which I am incapable of giving up. Sigh.  As Henry is fond of saying, he eats and I drink! 

But when you are invited to a casual dinner party and asked to bring a side dish, what should that be?  As far as I am concerned, this is not the time for elaborate, esotheric dishes.  Who wants that?  I think people would much rather sink their forks into comfort food like mac and cheese as opposed to say, curried lima beans in casserole (I did not make that up.  There is actually a recipe for it in one of my retro cookbooks, complete with cans of cream of mushroom soup and French-fried onions).

Think about the plate in front of you.  If it had a pile of curried lima beans next to a hunk of mac and cheese on it, where would your fork go first?  I rest my case.

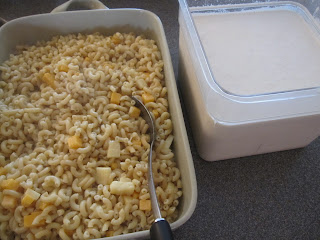
So for that dinner party the other night, I made my favorite mac and cheese from Scott Peacock"s brilliant book "The Gift of Southern Cooking" with Edna Lewis.  It's similar to the one we made at Watershed and it's the only mac and cheese recipe you will ever need.  If you're going to spring for it and make the stuff, then it may as well be the best "stuff" ever.  Based on the compliments around the table the other night (and every other time I've made it), this recipe more than qualifies.


MACARONI AND CHEESE   (adapted slightly from "The Gift of Southern Cooking" by Scott  Peacock and Edna Lewis)

1 lb. elbow macaroni, uncooked
10 oz. (2 1/2 cups) extra-sharp cheddar, cut into 1/2-inch cubes
1/3 cup unbleached, all-purpose flour
1 tablespoon Kosher salt
3 teaspoons dry mustard
1/2 teaspoon freshly ground black pepper
1/4 teaspoon ground cayenne pepper
1/2 teaspoon freshly grated nutmeg
1 1/2 cups sour cream
4 eggs, lightly beaten (I used extra-large)
1 small sweet onion, grated
3 cups half-and-half
3 cups heavy cream
2 teaspoons Worcestershire sauce
8 oz. (2 cups) extra-sharp cheddar, grated
1 cup panko or good breadcrumbs
Additional Kosher salt to taste

Bring a large pot of salted water to a rolling boil.  Add macaroni and cook, stirring frequently to prevent sticking, for about 9 minutes or until just tender.  Do not overcook as it will further cook in the oven.

Drain well and transfer to a large buttered baking dish (mine measured about 12 x 15 x 4).  Stir in the cubed cheddar and set aside.

Place the flour, salt, dry mustard, black pepper, cayenne pepper and nutmeg in a large mixing bowl, whisking to blend.  Add the sour cream, followed by the eggs and whisk again until well-blended.  Whisk in the grated onion, half-and-half, heavy cream and Worcestershire.  Taste carefully to adjust seasoning (it should taste somewhat salty as much of it will be absorbed by the macaroni) and pour over the cooked macaroni and cubed cheese in the baking dish.

Preheat oven to 350-degrees.  In a small bowl, mix together the grated cheddar, the panko and salt to taste.  Sprinkle evenly over the macaroni mixture.  Bake for 30 to 45 minutes or until the custard is set around the edge of the baking dish but still a bit loose in the center.  Remove from oven and cool for 10 minutes to allow the custard to thicken.

Serves 10 - 12


*  Now here's the thing:  this is a really easy recipe.  The only cumbersome thing is grating the onion, but that is no big deal.  You don't have to make a white sauce over the stove and you really don't have to do anything except combine a bunch of ingredients, grate some cheese and cook up some pasta.  So make the effort and take the time to grate your nutmeg as opposed to using the pre-ground variety.  As a matter of fact, if you have any of it in your spice cabinet, throw it away now and buy some whole nutmeg and an inexpensive nutmeg grinder (or use your trusty microplane).  This will make a huge difference in anything you make or bake which calls for nutmeg.

*  Also make sure to use the sharpest cheddar you can get your hands on.  This is not the time for wimpy cheese, like mild cheddar.  You want good, assertive cheddar so your mac and cheese has that edgy snap to it.

*  Salt is also crucial to this dish, but not after it is baked.  If you wait until then to add salt, it will just sit on the top and taste salty, but your mac and cheese will be bland.  That's why you need to add it to the cooking water, add it to the custard and add it to the topping.  I know, I know - we are all trying to limit our intake.  But as I said before, if you are going to bite the bullet and indulge in this, then it might as well be to the fullest.  You can mend your evil ways tomorrow.

*  Another thing.  Do yourself a favor and place your baking dish on a larger baking sheet when you put it in the oven.  It's unlikely that it will ooze over (if it does, you added too much custard or used a too-small baking pan) but cover your bases anyway.  Or your oven floor.

*  I took this out of the oven an hour-and-a-half before we transported it to my friend's house for dinner and it was another hour before we served it.  The key was covering it tightly with heavy-duty foil.  It stayed warm and melty until we devoured it.

*  I'll see you all at the gym next week........

Monday, March 21, 2011

Too Much is Never Enough


Henry has said for years that he isn't afraid I will spend all of our hard-earned money.  Nope, he is more concerned that I will give it away.  He's probably right.  You are unlikely to spot me at the mall buying shoes, clothes or jewelry (of course, that shows in the way I dress) but I'm a soft touch when someone is hungry or in need.  In my next life, I hope I get to be one of those "Secret Millionaires" who pretend they are just like the rest of us, then give much-needed funds to deserving individuals and organizations, amidst flowing tears, screams of disbelief and hugs.

Since I am in this life however, I fulfill those urges by pulling a complete overload when someone asks me to bring food to a potluck dinner or bake a birthday cake.  What, a simple birthday cake?  As I have posted several times (most recently a week or so ago), if one cake is good, then three are better!

I held to that standard this past weekend when yet once again, I offered to bake a cake for a friend's birthday party.  Luckily for me, she loves cheesecake and as we all know, I AM THE CHEESECAKE QUEEN and I could bake them in my sleep.  Nonetheless, they are pretty spectacular looking and the best thing is that they require no frosting or complicated decorating.  No pastry bags needed!

You already have my basic cheesecake recipe (courtesy of Glenn Powell and Elise Griffin-Hughes) which calls for 3 pounds of cream cheese, 2 1/2 cups of granulated sugar, 6 eggs and a 10 x 3-inch round (not springform) pan.  In case you missed it, here's the link:

http://nevertrustaskinnycook1.blogspot.com/2010/11/wheres-my-tiara.html

For this latest birthday extravaganza, I made the Chocolate-Espresso Cheesecake as detailed in the above post.  It was yummy, but you already know this.


I also made the basic vanilla version (posted there as well).  For the crust, I pulverized about half a package of Vanilla Oreos and combined it with 4 tablespoons of melted butter (gotta love all that fat!)  I then topped the finished cake with sliced fresh strawberries, glazed with a little melted strawberry jelly. 


For the third version, I decided upon key lime.  The crust consisted of 7 oz. gingersnaps, ground with 3 tablespoons of granulated sugar and 1 tablespoon of lime zest, then combined with 4 tablespoons of melted butter.  I then placed the 2 1/2 cups granulated sugar (as called for in the basic recipe - a little less if you want) in the food processor with 2 tablespoons of lime zest and 1 tablespoon of chopped fresh ginger.  This is what I used to add to the cream cheese in the electric mixer.  To the basic batter, I also added 1/2 cup of key lime juice and 2 teaspoons of pure vanilla extract.

I will refrain from modesty and admit that all three of these cheesecakes were fabulous.  If you tried any one of them on its own, you might even venture so far as to say it was the best cheesecake you ever ate.  Sampled at the same time, however, the winner for the evening was the vanilla-strawberry version.  I'm convinced it had something to do with those Vanilla Oreos!

Go, Laura!  You're so special, you deserve 300 cakes!

Friday, March 18, 2011

The Joys of Parenthood

I'm a pretty happy camper right now since my eldest son (that would be Andy) came home recently.

Home?  Who am I kidding?  He left our house in 2000 and has lived in NYC ever since.  He has a great apartment and a great life  up there, so in all honesty, I guess that's his home, not our house here in Atlanta.  Nonetheless, both he and his brother (Eric) still have their rooms in our house and I have no intention of ever, ever turning them into a gym or a library or any other such thing.  In some way, I hope they always consider this as "home," even if it isn't the house in which they grew up.

Andy's desk

Eric's room (stuffed animals and all)

When they come here, I'm like a little pig in you-know-what as it means I get to cook, bake and feed everyone to my heart's content.  This usually includes their friends, so there is no shortage of people around our dinner table.  The more the merrier, I say!

That's the good part.  Oh, but there is a bad part too, and if you have grown kids who no longer live at home, then you know exactly what I am talking about.  That's the fact that they go out late at night with their friends and don't get home until 3 o'clock in the morning.  Or later.

I know, I know.  They are adults and they manage quite well on their own in their respective cities, without  interference from parental units.  What we parents don't know won't hurt us.  But when they're under our roof?  Ha, that's a whole different story!

It starts when they head out at 11pm.  You go to bed as usual (falling asleep while trying to watch the news) and in a perfect world, you sleep soundly until 8am or so when you awaken to the sun streaming in the bedroom and the car parked in front so you know they made it home safely. 

Oh, but that's not what happens!  You fall asleep during the news alright, but then you wake up to turn off the TV at 2:30am and you can't help yourself.  You get out of bed, pad down the hall and realize that the outside lights are still on and they still aren't home (not that you expected them to be).  Crap.


You then go back to bed and pretend you are going back to sleep, but of course you don't.  You lie there, imagining all sorts of horrible things until you finally hear the key in the lock and the sound of muffled voices.  You breathe a silent sigh of relief, roll over and finally - FINALLY - drift off.  Of course, now it's 3:30am.  This will not serve you well when it's time to get up.  Or for the next two days afterwards.  Sigh.

So I take my joy in the fact that we are sleeping under the same roof (well, sort of, considering that they probably don't hit the bed within 3 hours of my getting up) and spending some good time together.  When Andy shows up, that means good time in the kitchen. 

This past weekend, he introduced me to Matbucha.  He described it as a cooked salad which originated amongst Moroccan Jews.  He calls it peasant food which is common to Israel and consumed at almost every meal.  I looked it up and of course he knew exactly what he was talking about.

http://en.wikipedia.org/wiki/Matbucha

We enjoyed it with dinner that evening and I will confess that I polished off the leftovers at breakfast for several days after he returned to New York.  While you might want to enjoy it for lunch or dinner instead, I highly recommend that you whip up a batch of this stuff.  It's another one of those easy recipes where the whole is greater than the sum of its parts.


ANDY'S MATBUCHA

2 tablespoons extra-virgin olive oil
4 green bell peppers, cut into large dice
1 large yellow onion, sliced
2 jalapenos (or other hot pepper), chopped
4 cloves garlic, minced
2 28-oz. cans diced tomatoes
1 6-oz. can tomato paste
Salt and pepper, to taste
Ground cumin, to taste
Cayenne pepper, to taste
Paprika, to taste
Zhatar seasoning, to taste

Heat olive in a large saute pan over medium heat.  Add green peppers, onion and jalapenos and cook, stirring frequently,  for 12 - 15 minutes until soft and tender, but not caramelized.  Add garlic and cook 1 minute more.

Add diced tomatoes and tomato paste.  Increase heat to medium-high and cook for 15 minutes more or until mixture thickens slightly.  Add salt, pepper, cumin, cayenne, paprika and Zhatar to taste.  Reduce heat to medium and cook for another 5 minutes to let flavors meld.  Taste to adjust seasonings.

Yield:  6 to 8 servings


The better the beer, the better the finished dish, right?


*  I would love to give you more specific amounts, but I was lucky just to get the basics from Andy  (see picture with beer).  He cooks like I do - a little of this, a little of that, oh and maybe more of both.  You can trust me that this recipe is delicious, but you're gonna have to trust your own judgment on the seasonings.

*  You can serve this warm, cold or at room temperature.  You can eat it alone, you can serve it as a side dish or you can serve it as a complement to meat, fish or chicken.  Or, take a leaf from my book and eat it for breakfast which I think is a healthy and spicy way to start your day!

*  One more thing.  Andy learned his basic cooking skills from me, but I think the student has now surpassed the teacher....

Sunday, March 13, 2011

Success!


Yep, I did it.  Took that Lemon-Poppyseed Cake and turned it into a fabulous three-tiered creation for my friend's birthday.  As I've said here before, sometimes I manage to surprise myself.

Here's the result:

Cake layers baked.
A good start.

Layered, tiered and frosted.
Lots of drinking straws buried underneath for support!

The birthday girl and her husband.
Think she's happy - hope so!

I'll admit - it tasted pretty good.
Not dry at all!

There is a wedding cake to bake in my future, so this was good practice.  In the meantime, however, I will get back to the business of posting recipes that "normal" people would make.  Well, maybe.

Unfortunately, I did not get to photograph the cake from it's front.  You are looking at the rear and the side (always how we want to be photographed, huh?).  Use your imagination....

Tuesday, March 8, 2011

This One's a Keeper


If you are one of my good friends, there is a high likelihood I will make you a birthday cake on your annointed day (assuming I know when it is, of course).  That's what happened recently, when I delivered a cake to my dear friend Charla (not her real name) at her place of work.

Charla is very careful about what she eats (far better than I!) and I know she's been doing her best to stay away from chocolate.  I could certainly work around that in deciding what kind of cake to make for her, but I wasn't sure where to go from there.  I ran down my list of favorites (hummingbird and salted caramel came to mind) but nothing sounded right.  I remembered a lavender pound cake I made for her several years ago (which she liked) and lime cornmeal cookies which were also among her favorites.

Then I espied those two Meyer lemons which I'd been hoarding.  I also discovered an unopened bottle of poppy seeds in the spice cabinet.  An idea for Lemon Poppyseed Cake started to dance in my head.....

I turned to that well-used tome in my kitchen, "Sky High" by Alisa Huntsman and Peter Wynne.  I wasn't looking to make a sky high irresistible triple-layer cake, but when I came across their recipe for Lemon Poppyseed Cake with Almond Cream Cheese Frosting, I couldn't resist.  As it turned out, this was a good decision.

If the reaction from Charla's co-workers was any indication, this cake was a pretty big hit.  One gentleman came over to tell me he was swooning and had just finished his second piece.  I loved that!  Haha, and he also made sure to tell me that his birthday is on October 12.  I hear you, Charlie!

The authors state that this cake is both rich and light at the same time.  I would have to agree.  I will tell you though, that brushing the layers with the lemon syrup is crucial.  If you skip this step, I think the layers will be too dry.  I love the fact that the layers are pure white (due to no egg yolks) and speckled with those tiny black poppy seeds which give the cake a lovely crunch.  I debated about replacing the almond extract in the frosting with lemon juice, but in the end, I didn't.  Another good decision.

I have to make a big birthday cake for a friend's big birthday next week. This one just might be in the running!


LEMON POPPY SEED CAKE WITH ALMOND-CREAM CHEESE FROSTING (adapted from “Sky High” by Alisa Huntsman and Peter Wynne)

3 cups cake flour
2 cups granulated sugar, divided
4 ½ teaspoons baking powder
½ teaspoon salt (I used kosher)
3 tablespoons poppy seeds
2 sticks unsalted butter, room temperature
Grated zest and juice of 2 lemons (Meyer lemons, if possible)
1 ¼ cups buttermilk, divided
5 egg whites (I used extra-large)
1/3 cup water

Preheat oven to 350-degrees. Butter the bottoms of three 8-inch round cake pans. Line the bottom of each with parchment or waxed paper and butter the paper.

Combine the flour, 1 ¾ cups of the sugar, baking powder, salt and poppy seeds in a large mixing bowl. Whisk to blend.

Place the butter in the bowl of an electric mixer and beat until smooth and creamy, scraping down sides of bowl several times. Add the lemon zest and mix well. Add the flour mixture and 1 cup of the buttermilk. Beat on low until completely mixed, then increase speed to medium and beat for 2 minutes to lighten and aerate the batter.

In a medium bowl, combine the egg whites with the remaining ¼ cup buttermilk and whisk to blend thoroughly. Add the egg white mixture to the batter in 3 additions, scraping down the sides of the bowl and beating only enough to incorporate. Divide the batter among the prepared pans.

Bake for 25 – 30 minutes, or until a cake tester inserted into the center comes out clean. Cool in the pans for 15 minutes, then turn out on a baking rack to cool completely.

Meanwhile, combine the remaining ¼ cup of sugar, the lemon juice and the water in a small saucepan. Bring to a boil, stirring to dissolve the sugar. Let cool slightly.

For the frosting:
1 ½ lbs. (three 8-oz. packages) cream cheese, softened
8 oz. (2 sticks) unsalted butter, softened
½ lb. confectioner’s sugar
Pinch of salt
1 teaspoon almond extract

Place cream cheese and butter in the bowl of an electric mixer. Beat well on high speed for at least 5 minutes, scraping bowl down often until no lumps remain. Add sugar in three parts, beating well each time and scraping down bowl as needed. Add salt and almond extract and blend well. Try to avoid eating too much of this stuff as you make it.

To assemble:
Place one layer, flat side up, on a cake stand or serving plate. Brush with 1/3 of the lemon syrup. Spread with a layer of frosting. Repeat with remaining two layers, then frost sides and top of cake.

Serves 8 - 10


* I am givng you this recipe as it was written.  In the interest of full disclosure, I made it in lovely 8-inch pans with removable bottoms which were given to me by my dear friend Stephen (you know who you are).  No need for you to follow that same path; just make it in whatever pans work for you.

*  And yes, I am going to make this for my friend's birthday.  In a tiered version, no less.  Heaven help me!  I have a feeling this could just be the next great cake-wreck!

*  Will keep you posted.  Even if it's ugly. It probably will be. Oy veh.

Wednesday, March 2, 2011

Alfajores


I’m just going to dispense with the niceties and cut to the chase. What do you read when you retreat to the china closet? Maybe you take the newspaper (get over that; newspapers sadly may not be around much longer, I fear) or maybe you take that novel you’ve been trying to finish, bit by bit, when you either sit on the throne or tumble yourself into bed at night. For me, it’s usually a cookbook. I will stand in front of my ridiculous collection, pick one out and head to you-know-where. I’ve re-discovered some of my best cookbooks that way.


The most recent in that category is “Second Helpings” by Danny Meyer and Michael Romano, featuring recipes from Union Square Square CafĂ© in NYC. I’ve had the good fortune to dine there several times and as I read through the book again, I was inspired by some of their recipes, most notably Pan Dowdy, Blueberry – Lemon Meringue Pie, Chocolate Pudding Flan, Butterscotch Pudding with Brown Sugar Sauce and Rosemary Cake with Honeyed Goat Cheese.

I also came across their recipe for Alfajores. What’s that, you might ask? Let me just describe it as a refined whoopie pie. It consists of lovely, tender lemon-scented cookies, layered with dulce de leche and finished with a bit of toasted coconut. I heartily recommend that you make them for your next dinner party. Or to heck with that, make them for your own consumption. They are lovely, lovely, lovely. Make them soon!


ALFAJORES (from Union Square Cafe)

For the cookies:
½ cup all-purpose, unbleached flour
1 ¼ cups cornstarch
½ teaspoon kosher salt
1 tablespoon baking powder
6 tablespoons unsalted butter, softened
½ cup granulated sugar
1 tablespoon lemon zest
1 egg (I used extra-large)
1 egg yolk (I used extra-large)

Sift together the flour, cornstarch, salt and baking powder. Set aside.

Cream butter, sugar and lemon zest in an electric mixer fitted with the paddle attachment, about 3 minutes. Scrape down bowl several times. Beat in the egg, then the egg yolk, scraping down bowl several times again. The mixture will look somewhat curdled; don’t worry about it.

Add the flour mixture and beat on low speed until dough just comes together. Turn out onto a sheet of plastic wrap, form into an oval and refrigerate for at least two hours or preferably overnight.

When ready to bake, preheat oven to 325-degrees. Roll dough out to ¼-inch thickness and cut into 2-inch rounds. Place rounds on a baking sheet and refrigerate for 15 minutes.

Place chilled rounds on a baking sheet lined with parchment paper and bake for 8 minutes. Rotate pan and bake for 2 minutes more until cookies have just set and are slightly puffed, but not at all colored. Cool 2 minutes, then remove to a cooling rack to cool completely. You will probably need to do this in 2 batches.

For the filling:
1 cup dulce de leche (see link below)
1 cup shredded, toasted coconut
Spoon about 1 tablespoon of the dulce de leche onto the bottom (flat side) of a cookie. Make a sandwich by placing another cookie on top, flat sides together. Press gently together to spread filling to the edges. Roll the sticky rim in the coconut. Repeat with remaining cookies.

Yield: 16 sandwich cookies

http://www.blogger.com/post-edit.g?blogID=965642241286780957&postID=2940803905136359241


*  I wasn't sure what to expect when I made this recipe.  I thought the dulce de leche might be too runny to make it work.  What I found was that yes, it was runny when I sandwiched it between the cookies but once I rolled the sides it the coconut, it set up pretty well.

*  Don't refrigerate these.  They are best left at room temperature.

*  The interesting thing about this is how the flavors meld together.  You get a little hint of citrus, but unless you know, you can't identify the dulce de leche.  I actually let Henry eat one (where were the Food Police?) and he didn't have a clue.  Well, duh - why would that be a surprise???  Mikey liked it, though!