I am just going to cut to the chase and dispense with my usual ramblings. That's because I want you to quit reading this blog RIGHT NOW and get yourself to a grocery store so you can buy the ingredients for Caramel Coconut Cluster Bars. Now, people, NOW!!!
You already know that I am a huge fan of Matt Lewis and Renato Poliafito, the founders of Baked (in Brooklyn) and the authors of three cookbooks, all of which inspire me beyond belief in the kitchen. I recently acquired their latest, Baked Elements and I couldn't wait for my kitchen to be functional so I could try out their newest recipes. I even made a list (yeah, I'm that ridiculous) of the ones I want to make first:
Easy Candy Bar Tart
Triple Rum Black Pepper Cake
Toasted Pumpkin Seed Brittle
Pumpkin Almond Cake with Almond Butter Frosting
Cheddar Corn Souffle
Poppy Seed Pound Cake
Lemon Pecorino Pepper Icebox Cookies
Chocolate Cheesecake Muffins
Cream Cheese Chocolate Snacking Cookies
Brooksters
Need I say more, other than to give you their recipe for Caramel Coconut Cluster Bars? (They were first on my list). I didn't think so. Here you go ...

CARAMEL COCONUT CLUSTER BARS (Adapted from Baked Elements by Matt Lewis and Renato Poliafito)

CARAMEL COCONUT CLUSTER BARS (Adapted from Baked Elements by Matt Lewis and Renato Poliafito)
For the
toasted coconut:
3 cups
shredded, sweetened coconut
Preheat oven
to 300-degrees. Line a baking sheet with
parchment paper. Spread the coconut in
an even layer on the pan and place in oven.
Bake, turning coconut with a spatula every 4 minutes until it just
starts to turn golden, about 15 minutes total.
Remove from oven and set aside to cool.
For the
base:
2 cups
all-purpose, unbleached flour
½ teaspoon
salt (I used kosher)
2 sticks
unsalted butter, cut into cubes and softened
½ cup
granulated sugar
½ teaspoon
pure vanilla extract
Increase
oven temperature to 350-degrees. Lightly
grease a 13x9x2-inch baking pan and line it with parchment paper to overhang
sides. Lightly grease parchment paper.
In a medium
bowl, whisk together the flour and salt.
In an
electric mixer fitted with the paddle attachment, beat butter and sugar until
fluffy, about 2 minutes. Add the
vanilla, then add the flour mixture and beat on low speed until just combined.
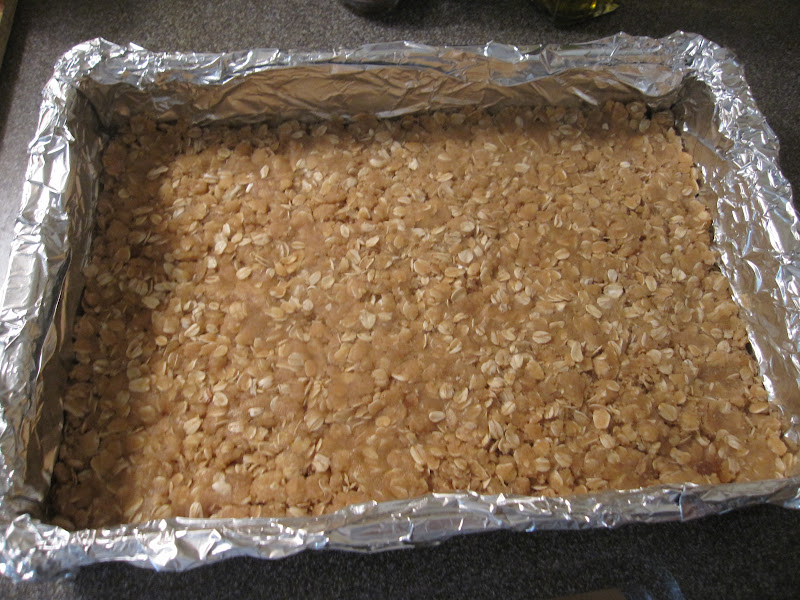
Turn the
dough onto the prepared pan and press into an even layer on the bottom of the
pan (do not press up sides). Prick the
dough with the tines of a fork and bake for 25 – 30 minutes or until just
golden. Remove from oven and place on a
wire rack to cool.
For the
caramel layer:
1 cup light
corn syrup
½ cup
granulated sugar
½ cup firmly
packed light brown sugar
1 cup heavy
cream
1/3 cup
sweetened condensed milk
½ stick
unsalted butter, cut into ½-inch cubes and at room temperature
1 teaspoon
pure vanilla extract
½ teaspoon
salt (I used kosher)
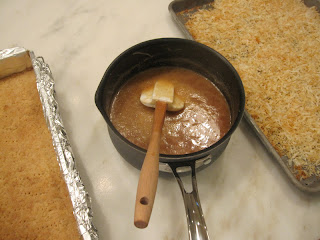
In a medium
saucepan, combine corn syrup, granulated sugar, brown sugar and 2 tablespoons
of water. Stir gently to combine and
cook over medium heat until mixture reaches 240-degrees (soft ball stage). Do not stir.
This will take 7 – 10 minutes and watch it carefully so it doesn't burn.
Remove from
heat and stir in the cream, sweetened condensed milk and butter. Be careful as it will bubble up. If needed, place back over medium heat until
mixture is smooth. Stir in vanilla
extract and salt.
Fold in 2
cups of the toasted coconut, then pour mixture over the baked crust, using a
spatula to spread it out in an even layer.
Sprinkle with remaining 1 cup of coconut and press lightly to adhere. Let cool at room temperature for 2 hours,
then refrigerate for at least one hour.
To
assemble:
6 ounces
good quality dark chocolate
2 ounces
good chocolate milk chocolate
Melt
chocolates until smooth. Remove bars
from pan and cut into desired pieces (I cut mine into 3 x 1-inch bars). Have ready a baking sheet lined with
parchment. Dip the bottoms of each bar
into the chocolate and scrape off excess with a small spatula. Place bottom-side-down on prepared sheet and
repeat with remaining bars.
Scrape
remaining melted chocolate into a pastry bag and drizzle over tops of
bars. Refrigerate 30 minutes to allow
chocolate to set up.
Yield: 24 bars (or more, depending upon how you cut
them)


Alrighty then. Here is what I have to say about these babies.....
* First off, these are addictive. I could eat the entire batch in just one sitting, which doesn't bode well for my ever becoming a skinny cook. It's why I had to give them away immediately, to my personal trainer no less. Haha, Luis - better on your thighs than mine!
* Make sure you use sweetened condensed milk, not evaporated milk. They are not the same thing!

* Make sure you use sweetened condensed milk, not evaporated milk. They are not the same thing!

* I think the addition of the chocolate is fifty-fifty. If you are a chocoholic, then by all means go for it, but I actually liked these better without it. Your call, or do what I did and only put chocolate on half of them.
* You guys might think that I'm the baking maven, but trust me, I screw up often. In making this recipe, I got ahead of myself and added the sweetened condensed milk to the corn syrup/sugar mixture. Oops! Rather than trashing it, I proceeded with the recipe and it caramelized just fine. Moral of the story: see if you can make something work before you hurl it in the trash. Just sayin'.
* One more kitchen postscript: while my new kitchen is well-designed (and fabulous!), I did not go with a ridiculous number of bells and whistles. A budget can only withstand so much. I did, however, incorporate a stand for my ratty old KitchenAid mixer which I've had for a million years. It hides neatly in a cabinet and when I'm ready to use it, I just pull out the shelf and rev it up. Awesome!


* One more kitchen postscript: while my new kitchen is well-designed (and fabulous!), I did not go with a ridiculous number of bells and whistles. A budget can only withstand so much. I did, however, incorporate a stand for my ratty old KitchenAid mixer which I've had for a million years. It hides neatly in a cabinet and when I'm ready to use it, I just pull out the shelf and rev it up. Awesome!


Wishing all of you a lovely Thanksgiving. For the first time, we have no kids coming home and I'm a little bereft. And of course, the irony is that I now have a great kitchen! Ah, life.......
But that said, we all have much to be thankful for. Enjoy your holiday and I hope you are spending it with those you love the most. Happy cooking!