
As I write
this, I’m sitting at the pool in a lovely beach house in Kiawah Island, South
Carolina. It’s a gorgeous late afternoon
and the only sounds I hear are the overhead fan, the crickets and the cawing of
the many crows that live on this island.
The pool is sparkling and inviting … but it makes me sad because it’s
empty.
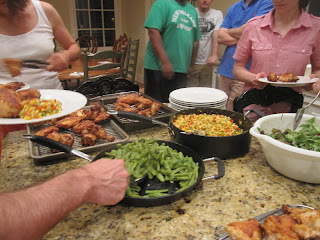
For the past twelve days this place has been alive with family and friends and now they’ve all gone home. It was a ton of work, but a lot of fun and I wish they were all still here. Even if I did have to fry chicken for them.
For the past twelve days this place has been alive with family and friends and now they’ve all gone home. It was a ton of work, but a lot of fun and I wish they were all still here. Even if I did have to fry chicken for them.
Yep, you
read that correctly. I eff-ing fried 70 PIECES OF CHICKEN for my kids
and their friends while they were here. You’d think I had enough of that at Watershed
and would welcome a vacation from it, wouldn’t you?


We have
stayed in this house at least half a dozen times before over the last seven or
eight years. It sleeps 12 comfortably,
has that lovely pool, is only a short walk or bike ride from the beach and it
has a fabulous kitchen. Let me repeat
that: IT HAS A FABULOUS KITCHEN.
Given my kitchen-deprived state right now, you can guess where I chose
to spend most of my time over the last two weeks. Hence that fried chicken.
Here is the “recipe”
if you can call it that. It is based on
Scott Peacock’s version of fried chicken in his book with Edna Lewis, “The Gift of Southern Cooking.” It’s an adaptation of the method I use at
Watershed. Yes, it’s time-consuming, but
you don’t have to be like me and overdo it (although
I will say that those thirty-something “kids” managed to put most of those 70
pieces away). The proportions I’m
giving you are what I used, but you can scale it down. Just keep the same ratio of flour to
cornstarch in the dredge.
There are
three steps to this process. Two days
before you are ready to fry, you must brine the chicken overnight. The next day, you must drain it, then soak it
in buttermilk overnight. You will fry it
on the third day.

And then the hungry hordes will show up!
FRIED CHICKEN (in the style of Watershed, Scott Peacock
and Edna Lewis)
4 chickens,
each cut into 8 pieces
For the
brine:
1 gallon
water (preferably filtered or spring water)
1 cup salt
(I used kosher)
Stir water
and salt together until salt is dissolved.
Two days before you want to fry, place the cut-up chicken into a large
container and pour the brine over. Cover
and refrigerate until the next day.
For the
buttermilk soak:
½ gallon
buttermilk
Remove
chicken from brine. Place into a
container large enough to hold it and pour buttermilk over. Toss well to coat each piece then cover and refrigerate
overnight.
For the “fry
fat:” (as Chef Joe Truex
at Watershed calls it):
1 gallon
peanut oil
1 lb.
applewood smoked bacon, cut into 2-inch pieces
1 lb.
unsalted European butter (such as Plugra)
Place all
ingredients in a large stockpot over medium heat. When butter melts and the mixture is hot (but
not boiling), turn heat down as low as possible and let it simmer for 2 to 3
hours, stirring occasionally. Strain
into a large, heatproof container and set aside. (If not using immediately, refrigerate
overnight and bring to room temperature before proceeding).
For the
dredge:
2 ½ lbs.
all-purpose, unbleached flour (10 cups)
1 cup
cornstarch
¼ cup kosher
salt (4 tablespoons)
2
tablespoons freshly ground black pepper
Place all
ingredients in a large tub or bowl.
Whisk to combine well.
To fry
the chicken: (Day Three)
Get the
largest sauté pan you have. Figure out
about how many pieces of chicken it will hold without crowding, then set it
over medium heat. Add enough fry fat to
come up to about a 1-inch depth and heat it to 325-degrees.
In the
meantime, dip only enough chicken pieces that the pan will hold into the
dredge. Toss them well to coat, then
remove them one-by-one to a rack placed over a baking sheet, slapping each one
well with your hands to remove excess dredge (as Chef Scott and Chef Joe like to say, you only want a “rumor” of
flour on each one). Less is more
here, believe it or not.
When fry fat
reaches the desired temperature, gently slip the chicken pieces skin side down into
the hot fat. They should be bubbling,
but not too much. You are looking for
just a gentle bubble, so you know it is cooking, but not too fast.
After about
10 minutes, start checking to see if the pieces are golden on the bottom
side. If so, use tongs and a spatula to gently
turn them to brown the other side. If not,
let them go until they release from the pan and are golden. Once turned, each piece should take another 5
to 10 minutes. Don’t crowd them and don’t
rush them.
As chicken
pieces are done, use tongs to remove them to a rack set over a baking
sheet. When all pieces have been
removed, you must drain the fat from the pan into a strainer set over a
heatproof bowl, then wipe out the pan so that no browned or burned bits remain
(sometimes it helps if you use a little hot water, then scrape up any bits and
wipe the pan well with a dish towel).
Return pan to the heat, pour the strained fry fat back in, bring it back
to temperature and then proceed with your next batch of chicken. Repeat this process until all pieces are
fried. (If you are crazy like me and are
doing a ridiculous number of pieces, then you should use new fry fat after
about the third batch or so).
Yield: 32 pieces


At the restaurant, we make our fry fat with a combination of lard, smoked pork shoulder (or country ham) and Plugra. That's great if you want to render your own lard (don't even think about using that boxed hydrogenated stuff you find on the grocery store shelves), but if not, peanut oil works just fine. I have also found that applewood smoked bacon is a good substitute for the pork shoulder or country ham.
When it comes to the oil temperature, I don't use a thermometer. I just sprinkle a little of the dredge mixture into the pan when I think it's hot enough. If it produces a few bubbles, then your pan is ready for the chicken.
Here's the biggest tip: you don't have to fry your chicken at the last minute so you can make sure it is hot and crisp. Just keep it on that rack until you are ready for it, then transfer it to a baking sheet and slip it into a 425-degree oven for about 10 minutes. It will emerge hot and crispy and no one will ever know that you did not fry it up for them at the very last minute.
.jpg)
So now you
know that this is truly a labor of love.
Some would debate whether or not it is worth the work. It is to me, when I hear the compliments from
our guests at Watershed or, more importantly, when my kids and their friends heap
on the praises and scarf down enormous quantities of it. But here’s my dirty little secret … I would
never fry this stuff in my own kitchen.
Thank you, beach house!
Thank you, beach house!


Wow! That really is a labor of love! I think I'll let experts like you keep cooking the fried chicken.
ReplyDelete